How to Build a Better Home
With an EconOdome Frame Kit,
Proven Building Methods,
And, Quality "Value Added" Products
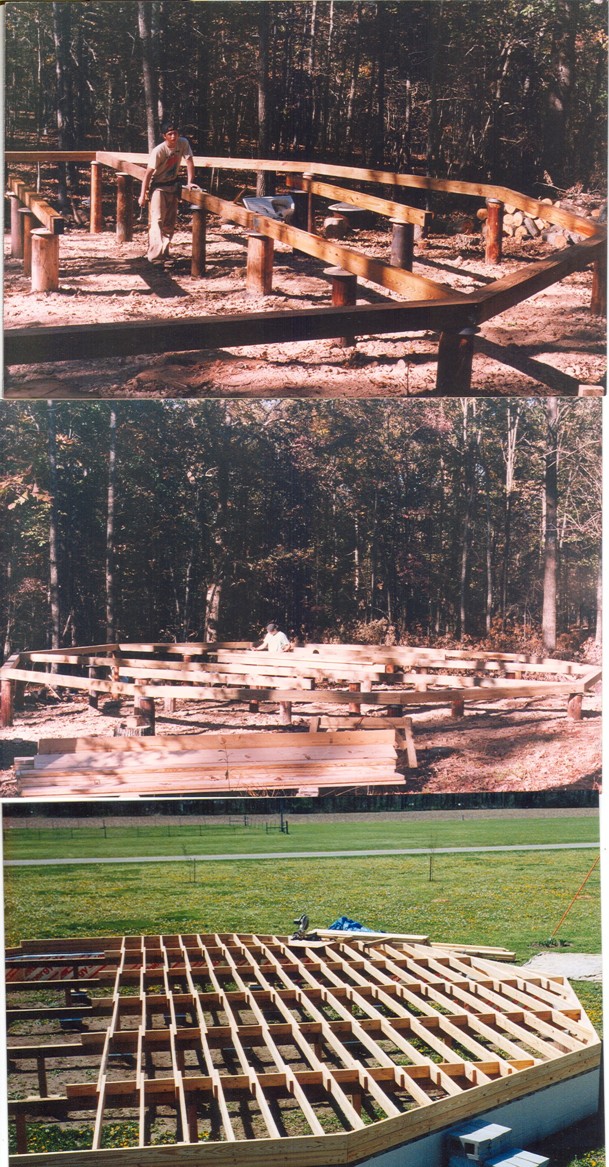
Foundations and Floors
Problem:
Many foundations and floors are difficult to layout and build.
Solution:
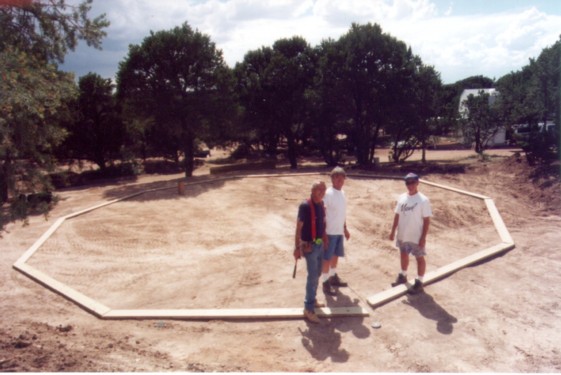
Position ten identically cut boards on the ground.
All ten perimeter corners are aligned using the radius
to measure from the center to the ten outside corners.
All ten corners can also be leveled using the top of the center stake as a reference.
To center the footing below the perimeter walls,
dig your perimeter footing ditch 6 inches to the outside
and 6 inches to the inside of the aligned base boards that
are laying on the ground. The perimeter footing ditch
should extend below where the ground freezes. Your local
frostline depth varies depending on the location of your building site.
You will have to ask questions to find out the depth of your frostline.
The ends of sill plates
are cut 18 degrees away from 90 degrees as shown below.
All ten sides have the same lengths
and end angles with our ten-sided buildings.
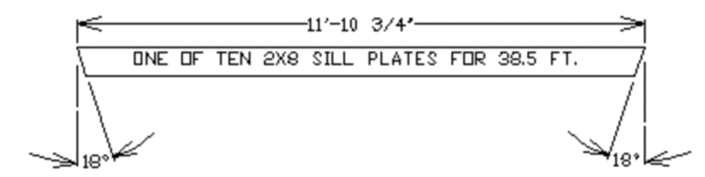
The ten identical treated sill plates will later be bolted
to the top of your concrete footing or cinderblock crawl space wall.
A crawl space will allow you to install pipes and wires under the main floor
after the building above is enclosed and sealed.
The floor system drawn below uses economical 2x6 floor joists with 4x6 supporting beams.
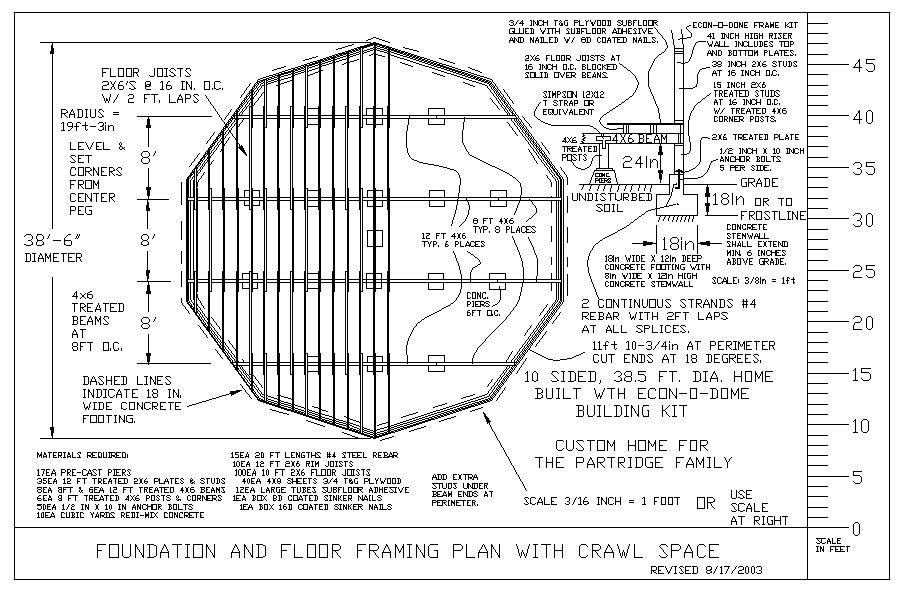
The perimeter, above the concrete footing and below the main floor,
can be supported with a short wall made of lumber or concrete block.
It is important that any wood framing is at least 6 inches above the
ground at the nearest point.
There are many ways to build a substantial foundation.
You can use a lot of concrete or not so much concrete.
This is important to consider as a lot of redimix concrete can be expensive.
Using telephone poles and securing with tamped gravel can zero the use of concrete.
Below are some economical ways you can build a substantial foundation and floor.
See more plans, photos, and construction details
on this website and in the EconOdome DVD.
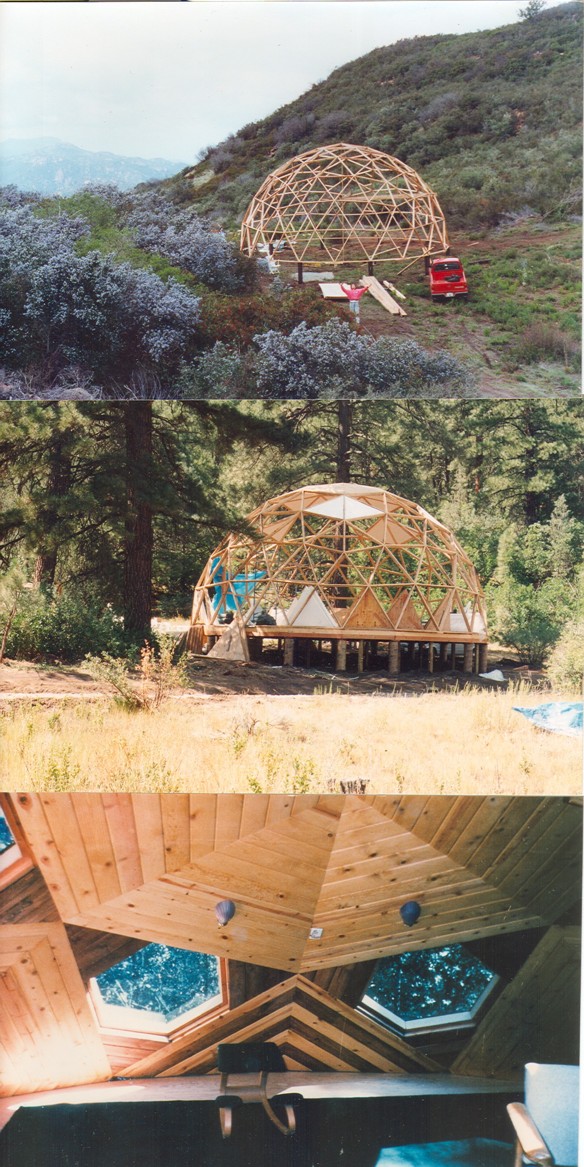
Node Connections Riser Wall Construction
Elastomeric coatings, done properly, look like real stucco,
DensDeck Prime Roof Board sheeting may be
The "tape coat" is most efficiently, effectively, and economically
We recommend that you add a minimum of two "final coats" of tinted Product #2200.
Insurance companies estimate that about 40% of claims are due to storm damage The photo above shows how the exterior of a dome can be accessed
Problem:
There are voids at the triangle tips with some dome hub connection
systems where the triangular panels are most fragile.
And, excessive expansion and contraction between triangular panels
with some other dome connection systems where adjacent triangular panels are bolted together.
Expansion and contraction between panels causes cracks in the interior drywall.
Solution:
EconOdome struts are precision double compound miter cut to form fitting pointed ends
so that the strut ends can make physical contact and provide support
at the triangle tips where the panels tip could break.
Expansion and contraction between triangular panels is minimized
as adjacent triangular panels are joined to a single board where panel edges meet.
EconOdome struts are stitched together at the ends with 3" long hi-tech stainless steel screws,
then the ends of the struts are strapped together with stainless steel metal straps,
and then the exterior triangular panels are are connected to the triangulated frame
forming a nearly hemispherical compound curved shearwall.
These three simultaneous methods of connection make the building very strong and resiliant.
We call this connection the "Synergetic Hub".
The areodynamic EconOdome building can withstand high winds, deep snows, and earthquakes.
Problem 1:
Some dome home kits are not exactly flat on the bottom which makes
connection to a riser wall difficult and unstable.
Solution 1:
The hemispherical EconOdome framework is flat on the bottom for easy and
balanced attachment to a riser wall or directly to a flat floor.
Click here to see EconOdome kit assembly.
Problem 2:
Perimeter Riser Walls shifts and require temporary bracing to square walls.
Solution 2:
Internal diagonal bracing within the frame squares and stabilizes the walls
while eliminating the need for temporary diagonal perimeter wall bracing.
Problem 3:
Exterior structural sheathing panels does not interconnect adequately at corners.
Solution 3:
Ripped to fit 4x6 corner posts join
both the sheathing and the framed walls at the corners
Interior Walls
Problem:
Partitioning the interior of a round building without wasting space and
also create an elegant feeling inside the dome home.
Or, how do I divide the interior of a dome home and
avoid creating awkward corners are less that 90 degrees.
Solution:
The Honeycomb floorplan which works well with the ten equal sided EconOdome building.
The Honeycomb floor plan has a central five sided livingroom with five
six-sided rooms around the perimeter. With this floorplan layout,
all inside corners are 90 degrees and more.
Walls are positioned as shown in the floorplans.
You will notice that most walls intersecting the perimeter, do so at right angles.
This avoids the problem of corners that are less than 90 degrees.
Installing conventional doors and windows
Problem:
Installion of conventional doors and windows in the sloping surface of a dome.
Solution:
Vertical surfaces are integrated into the framing at the lower perimeter which
allows the framing of conventional doors abd windows without the need for extensions.
With all EconOdome frame kits custom framed openings for doors, windows, and skylights
are included at "no extra charge".
Sealing the Exterior
There are many ways to weatherseal the roofs of all types of buildings.
And there are many considerations with each waterproofing system.
All roof sealing systems require regular inspections and maintenance.
There are three distinctively different waterproofing methods
that can effectively seal a dome home roof:
Shingles (composition and metal),
Roll roofing (composition, TPO, EPDM), and
Elastomeric (paint-on sealers).
Of these options we have found that the quickest and most reliable method
for sealing the roof is the use of large TPO shingles are
already glued onto the exterior triangle panels.
So, we now do this at no extra cost for
if you purchase both exterior triangle panels and precut TPO shingles.
There are many roofing products and roofing manufacturers to choose from.
One of the main reasons for using TPO shingles that are already attached to the
triangle panels is because it is so much faster and more reliable than other roofing methods.
For your information:
Composition and metal shingles are installed from the bottom upward.
Composition and metal shingles can only be used where the slope of the roof is steep enough
so that the shingles shed water.
This means that if you use shingles on a dome roof,
you will need to consider a different waterproofing method
on the low slope portion at the top of a dome home.
At the top of the dome you could consider using roll roofing
that is lapped over the shingles a distance away from the top.
Or you could consider sealing the top or the entire dome roof
using any of many available commercial waterproofing systems
that are commonly used on large low slope nearly flat roofs.
Large TPO shingles and fabric reinforced elastomeric coatings
work well to seal the top of the dome and the entire surface.
If you use paint on waterproofings the base sheet should be DensDeck.
And, if you use paint on waterproofings all seams and fasteners
must be covered with reinforcing fabrics saturated with elastomeric sealing paint.
In additon, pieces of saturated scrim should lap and cover the entire surface.
Doing this with ensure a sufficiently thick durable waterproofed surface.
Elastomeric coatings require multiple coats and embedding reinforcing fabrics.
Sealing your roof with large TPO shingles is a one-step sealing process.
Using either a paint on waterproofing system or the TPO shingles sealing method
will allow you to install triangle panels and seal your dome home roof
from the top downward. This will allow you to keep the sheeting materials dry.
You can keep the sheeting materials dry by installing and sealing panels in
a process where each level of triangle panels is sealed before installing and
sealing more panels at a lower level. Keeping building sheeting materials dry
will help to avoid problems with mold, condensation, and expansion and contraction.
If you wish to seal the roof of your dome home with elastomeric waterproofing materials.
We have found that the saturant/primer/sealer "Vap-R-Loc" works
well in conjunction with Pol-E-Force seam tape, however,
Vap-R-Loc must be topcoated, and
Densdeck must be used a substrate under the waterproofing.
We, and other folks who have already built dome homes
have done the work of testing and comparing prices and quality.
We, and other folks who have already built dome homes
have also done the work of testing waterproofing systems that work and don't work.
This knowledge base has taken over 30 years of dome home building to accumulate.
We want to make sure that you purchase the best possible products to ensure
that your home will be waterproofed properly at the lowest possible cost.
However, you must understand that
you may choose to waterproof your dome home using the method you wish.
We at Faze Change Produx are primarily in the business of manufacturing
EconOdome kits and helping to advise clients concerning design options
and procedures for building custom dome homes using many different foundation
sysems, many different interior and exterior layouts, and many different
waterproofing systems/methods.Waterproofing options:
Elastomeric Coatings, Thermoplastic Membranes and Shingles
however, elastomeric coatings require multiple coats and diligent maintenance.
The exterior surface may be effectively sealed by applying a liquid membrane system
painted over a base sheet material called DensDeck Prime Roof Board.
When using spec-chem.com elastomeric products:
After the insulated panels are attached and the gaps are filled with foam,
The seams are positively sealed by brushing on a flexible spun woven polyester tape
using a liquid elastomeric sealer that dries to form a tough rubbery skin.
This sealing method is called, "a saturated seal".
This sealing method has many advantages.
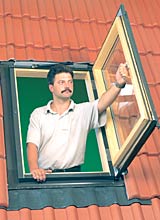
Skylights are easy to install and seal.
You can complete the sealing process "one level at a time" from top to bottom
while standing on the sturdy framework. And, after a storm, you can
"detect a possible leak" by just looking at the exterior surface for a damaged area.
The damaged area can then be easily repaired with a paint brush, seam cloth and elastomeric sealer.
What is just as important as the outside covering
is the material that is just under the outside covering.
DensDeck Prime Roof Board bonds tenaciously with painted on elastomeric membranes.
DensDeck is inorganic in that there are no additives that will support mold growth.
The gypsum base is mixed with silicone to inhibit the absorption of moisture.
The factory bonded woven fiberglass matting on both sides
is designed to bond to waterproofings or contact adhesives.
See
detailed info on DensDeck Prime Roof Board.
See info on SureWeld TPO reinforced membrane roof coverings.
At our factory glue large TPO shingles to ventilated OSB panels.
If you live in a fire prone area, we can glue your TPO shingles to DensDeck.
DensDeck is more fire safe than wood OSB triangle panels.
DensDeck Prime Roof Board is designed for use on roof surfaces.
DensDeck Prime Roof Board is made by Georgia Pacific.
We recommend using 1/2" thick DensDeck Prime Roof Board
as a cover/cladding surface over insulation sheeting
DensDeck Prime Roof Board can be cut with a utility blade knife.
If you are installing DensDeck Prime Roof Board glued over rigid insulation,
you may attach the panels with screws and large flat washers as shown below.
Or, you may wish to use hot dip galvanized ring shank nails with the washers.

You may wish to order these washers and screws from www.demandproducts.com .
Click on "EFIS" then on fastners. You are looking for plaster repair washers.
DensDeck Prime Roof Board may also be installed on the vertical surfaces at the
lower perimeter of the dome, if you want a stucco finish on your exterior walls.
If we make your exterior triangle panels we will supply the necessary fasteners.
3-Coat Waterproofing Process:
installed over rigid insulation sheeting.
Fill any gaps between the panels with expanding foam.
It is helpful to use expanding foam with a dispenser gun.
Saw off any excess with a bread knife or hack saw blade.
You are now ready to begin the sealing process.
After the first five triangles are taped and roll coated with Vap-R-Lok
you may then install and seal 15 more triangles at
the level just below the top five triangles.
Do not put any texture on surfaces that will be taped.
The texture coat is used to hide the taped seams and nail heads.
You must seal each level of triangles before moving to a lower level.
Basically, you will be making an umbrella that will get closer to the ground
as you install and seal more exterior panels.
The reason for this method of enclosing the dome is to
keep your building materials dry under the sealed dome umbrella.
Tape Coat
done using 4 inch wide Pol-E-Force spun woven polyester cloth tape
that is saturated with Vap-R-Loc using a three inch wide paint brush.
The strechy cloth tape will seal over all panel joints and all nail heads.
After all the seams and fasteners have be covered, the entire surface should be
roll painted with Vap-R-Loc primer/saturant to create a complete base coat.
These waterproofing products are manufactured by
Specifications Chemicals who developed the "saturated seal".
This development allows us to create invisible expansion joints
that allow building movement and are waterproof.
To create a very excellent and more durable finish, you may want to cover
all flat surfaces with a cut-to-fit scrim material that will lap over the
Pol-E-Force tape at the corners. I mention this as lapping the very shear scrim
material over the tape at the corners helps to hide the tape and also provides
a more durable and leak resistant surface.
If you wish to order waterproofing materials from elastomeric products
from Specifications Chemicals,
talk to Susie, and, mention EconOdome to get the special low price
we have negotiated for our customers.
Click here for complete 2016 pricing pdf for elastomeric coatings.
Click here for complete 2016 pricing pdf for reinforcing fabrics.
Color Coats:
Product #2200 goes on thicker than most elastomeric sealing paints,
so, it will take fewer final coats to achieve the required 50 mil thickness.
Product #2200 may be tinted to your desired color.
If you have been careful to ensure that all seams and fasteners have been taped,
and if you have applied each coat as thick and complete as possible,
Then your roof will be more durable and leakproof.
To ensure that you get the correct products and apply the products properly,
please direct waterproofing questions to Suzy Salter at Specifications Chemicals.
The cost of the final coats of elastomeric, Product #2200,
is reduced by about 6.35 dollars per gallon for our clients.
Please talk to Susie at Specifications Chemicals and say
you were referred by Faze Change Produx to get this price reduction
.
Cost for tintable #2200 topcoat elastomeric is $124.25 per 5 gallon pail.
Untinted Product #2200 has a very high reflectance.
White Plastic has received a cool roof rating by the State of California.
Experience as show that rolling on #2200 elastomeric with a thick nap
paint roller provides the best final coating of elastomeric.
You may choose from the 12 standard colors offered on the color chart below.

are caused by hail. Rubber membrane roofing can prevent hail damage.
We reccommend recycled rubber elastomeric roofing and TPO shingles as they are effectively used on
commercial roofs that protect hotels, office buildings, factories, and warehouses.
The same sealing methods and roofing products can be used on residential dome homes.
Note: The EconOdome frame is rounded enough to shingle
without cutting and lapping at the geometry lines, if,
you want the shingled look, or, are sealing the exterior in cold weather.
However, it will be more labor intensive to install shingles and
more difficult to reliably seal skylights on a composition shingled surface.
Sheetrocking a High Ceiling
Problem:
Working upsidedown on ladders & scaffolding is difficult and time consuming.
Solution:
Enlist the help of gravity, expose the beautiful geodesic patterning,
and eliminate working up-side-down with the EconOdome T-Beam/Drop-In-Panel building system.

with an extension ladder. Both the interior insulated triangular panels and
the exterior triangular panels are installed from the outside of the framework.
The surface is sealed as the panels are installed so that the panels can be kept dry.
A tarp may sometimes be used over the dome to create shade or protect panels
that have not been sealed from rainwater.
However, if you want to order the more economical "Basic" frame kit, we have also figured out
how to make that as easy as possible. The triangles are smaller on the EconOdome frame kit,
and, we have positioned blocking where it should
be so that you can use smaller pieces of sheetrock on the interior ceiling.
|

Your purchase of each casement style roof window
will include flashing and a roll-up screen per pricing listed above.
After you have ordered your Fakro roof window,
we will email you a billing for the exact shipping cost to your location.
You may then pay the shipping cost billing securely
with a credit card or PayPal account.
Please phone or email our office if you have any questions.
Fakro skylights will ship from a warehouse in Chicago, IL.
Shipping cost within the USA
for each skylight, flashing kit, and roll-up mosquito screen
will be approximately 45 dollars.
Roll-up screening units will ship separately.
If you live in the state of Illinois, 6.75% state sales tax will be added.
Without state tax cost of each unit including flashing & screen is $657.
If you wish to purchase a 24"x38" casement style egress window sized
to fit within the triangles of a 38.5 ft. dia.EconOdome frame kit,
push the BUY NOW button below these words.
Another value added product is insulated and folding attic stairs that can be used for
fold-up-and-away access to the second floor of a garage dome.
Please see info at
 www.atticstairsus.com
Insulation, Ventilation, and Condensation--
Problems:
1. Building frames conduct heat and cold causing a loss of energy
efficiency.
2. Also, unventilated air space behind the sheathing in
high humidity climates can support
mold growth.
3. Insulation systems must have ways of either controlling the condensation
dew point or evaporating any accumulated condensation.
Solutions:
The exterior edges of the 2x6
frame of our T-Beam frame kit are notched 1/2 inch deep on
the outside edges.
We notch the edges of the 2x6 frame to allow panel to panel
ventilation outside
the insulating triangular panels. Moist, stale air
that migrates into the ventilation cavity
is allowed
to flow up and out a flashed opening near the top of the dome roof.
This "breathing"
feature allows the entire building to be cooler in the summer and
to have healthier
interior air all year long. There is a very small amount of air
flow around the edges
of the triangular panels.
This slow outward migration of interior air expels humidity and
stale, toxic air while having
a negligible effect on energy efficiency.
Most homes have maintenance problems that are very expensive to
fix. We have found
that covering the exterior with Hardipanel and then sealing with
elastomeric sealers
as described below, solves many problems. The exterior surface is
durable, fireproof,
and easy to maintain for many years. Covering the exterior with
Hardipanel and then
sealing with elastomeric paint also helps to keep bugs out of the
building and provides
an exterior that does not deteriorate with time.
Basically, using Hardipanel allows you to cover your home with
durable cement panels
that can be reliably sealed using technologies that have been
developed to seal large
commercial buildings where each seam is treated as a building
expansion joint.
In addition to either conventional insulation or
radiant heat barrier insulation,
an additional one inch of rigid insulation board
or, an additional air space may be
installed under the Hardipanel
to help make the building even more energy efficient.
From both a practical and a mathematical
point of view, the dome is the most energy efficient
building shape possible.
This is because the dome shape has the smallest surface area
for a given amount
of internal volume. And the roof shape makes it possible
to have two floors of living space.
One floor is just above ground level and another floor level
is just under to dome roof.
There are no boards in the way to inhibit full use of
the upper floor that is under the
dome roof. Many insulation possibilities exist.
If you are building where it drops below
freezing in the winter, then you may want to consider
our standard 2x6 frame with an additional
inch of insulation board just under Hardipanel.
This extra inch of insulation insulates
the entire building, including the framing. This additional one inch thickness
of rigid insulation board stops condensation from forming inside the cavity space.
In effect, a layer of continuous insulation just under the siding/roofing controls
the dew point and also greatly increases energy efficiency.
Or, you may want to consider building a double dome
with two 2x4 EconOdome frames.
One dome is built about a foot inside a second dome.
The large space between the inside
and outside dome frames is used for both insulation and
ventilation. The cost of a
double 2x4 EconOdome frame is the same as our
standard 2x6 "T-Beam" frame kit. With either choice,
you will have a very energy efficient building.
If you want to use our more economical "Basic"
EconOdome frame kit here is one way
to use radiant barrier insulation
(layers of foil stapled into place)
that is easy and economical.
Holes are drilled along the center of
the struts, allowing
cavity ventilation air to flow from
panel to panel.
Then, two layers of half inch thick
spacers and two layers of foil are installed to the inside of the frame.
Now, here is how to install the foil:
Step One: A layer of foil is stapled flat
over the inside edges of the EconOdome
frame.
Step Two: Spacer strips are attached over the
inside of the foil where there is support under the foil.
Step Three: A second layer
of foil is stapled over the spacer strips.
Step Four: A second layer of spacer strips is attached
above the second layer of foil.
Step Five: The drywall is glued and screwed
to the spacer strips.
The spacer strips
are made from the plywood scrap leftover from cutting the
plywood for the roof. This method
is highly effective. The air spaces combined with the
layers of foil reflect and insulate
extremely well. A rough estimate is that about 95% of
the heat is reflected out in the summer
and 95% of the heat is reflected in during the winter.
The space shuttle uses this technology.
We did this on a dome home in Ann Arbor, Michigan for
an architect who wanted to ensure that
any moisture that accumulated in the shell cavity for
whatever reason, was able to evaporate
and go up and out thru a vent near the top of the dome.
Using this method also helps
to isolate the dome building frame from the interior environment.
Isolating (insulating)
the EconOdome building frame reduces heat and cold conduction
which increases energy efficiency.
Radiant barrier insulation is
the latest technology and allows
one to
build a very energy efficient building using a single
"Basic" 2x4 EconOdome building frame kit.
A "Basic" 2x4 EconOdome kit costs 25% less
than our standard "Basic" 2x6 kit.
For example, the cost of a "Basic"
30 foot diameter 2x4 EconOdome building kit is $6,750 plus shipping.
Click on the word PRICES on our home page to see pricing of
"Basic" 2x6 EconOdome frame kits.
Advanced Technology and Optional Construction Method
The drawing below shows a section view of an advanced technology T-Beam assembly method using thicker 3/4 inch cdx sheathing, radiant barrier panels, and a more economical 2x4 on 2x4 T-Beam frame construction. If you order your T-Beam frame with all 2x4 construction, the cost will be 10% less than our standard T-Beam Kit having 2x6 with 2x4 trim construction. Please contact us if you have any questions about this advanced technology or questions about our standard 2x6 frame and panel kits.

Cost-- Problem: Often too high due to too much custom work & tacked on contingency costs when work is "contracted" after receiving "bids".
Solution: Faze Change Produx has eliminated or streamlined many of the costly steps required to build an elegant dome home. The EconOdome Planning & Building Manual includes detailed building instructions. Also, when you purchase a plan set you will be supplied with a detailed material list and step-by step building instructions. This will allow you to hire help "by-the hour" and eliminate contingency costs. Even some contractors will work on a "time & materials" basis. This eliminates stress for the contractor and the EconOdome design reduces on-site building costs.
See More Floorplans
Return to Photos Menu
Home, Sitemap, & Contact Info